Monday, June 28, 2010


Well, it’s time for a bee update…several folks have asked how the bees were doing and my response is generally, ‘busy’…now as you may remember, it was back in mid April, when we received our package of bees and set about being beekeepers…and I must say all has been going very well. We took a beekeeping class at the end of April and learned some of the finer points of keeping these little guys happy and healthy. The next job was to check the hive about every 2-3 weeks to make sure everything was going along nicely. We had heard horror stories from other beekeepers about not checking the hives often enough and having them over run with these disgusting moths that can attack a hive, or having the queen get sick and the hive just sort of withering up. So a couple weeks into May we gave our crew a check…lots more bees – yippee!
We determined it was time to add a second box on top of the first to let them expand further.
Now when the Sacramento summer goes full tilt there is lots of stuff growing and blooming and a lot for a little bee to do… producing more bees being high on the list. Well I started noticing that there seemed to be a lot of bees hanging out outside the hive and proceeded to freak out that they were getting too crowed and would swarm and hence leave us for more palatial digs…so long about the first of June we decided to do a very thorough check of the hive and sure enough they had all but filled up the second box! Now I’ve gotta say, calling someone busy as a bee is bordering on wacky, nobody can work that hard! Anyway we added another half size box and figured we were well on our way to being able to harvest honey…
Three weeks have passed since then and yesterday, one of our first truly hot summer days,
we donned our bee garb, hat with screen, long sleeved shirt, long gloves, jeans with legs tucked into socks…uber hot – even I, a non-sweaty sort of gal was literally dripping – I just kept thinking ‘ this is probably really good for my skin…’ We then fired up our smoker, the smoke seems to calm the bees and they become a lot less active, which
at this point is really important since there are so many and they get really cranky when you start messing with their stuff.
We then started our inspection. Now there are LOTS of bees! It is actually more difficult to do our work because they are everywhere! They are beginning to fill the third box with comb and there are frames in the second box filled with honey! There were also all sorts of bee larva, another good sign. The full boxes actually weigh in at about 40 lbs! We thought about taking some of the honey but thought we would let them fill up the third box a little more before we started harvesting. I am so curious about what our honey will taste like!
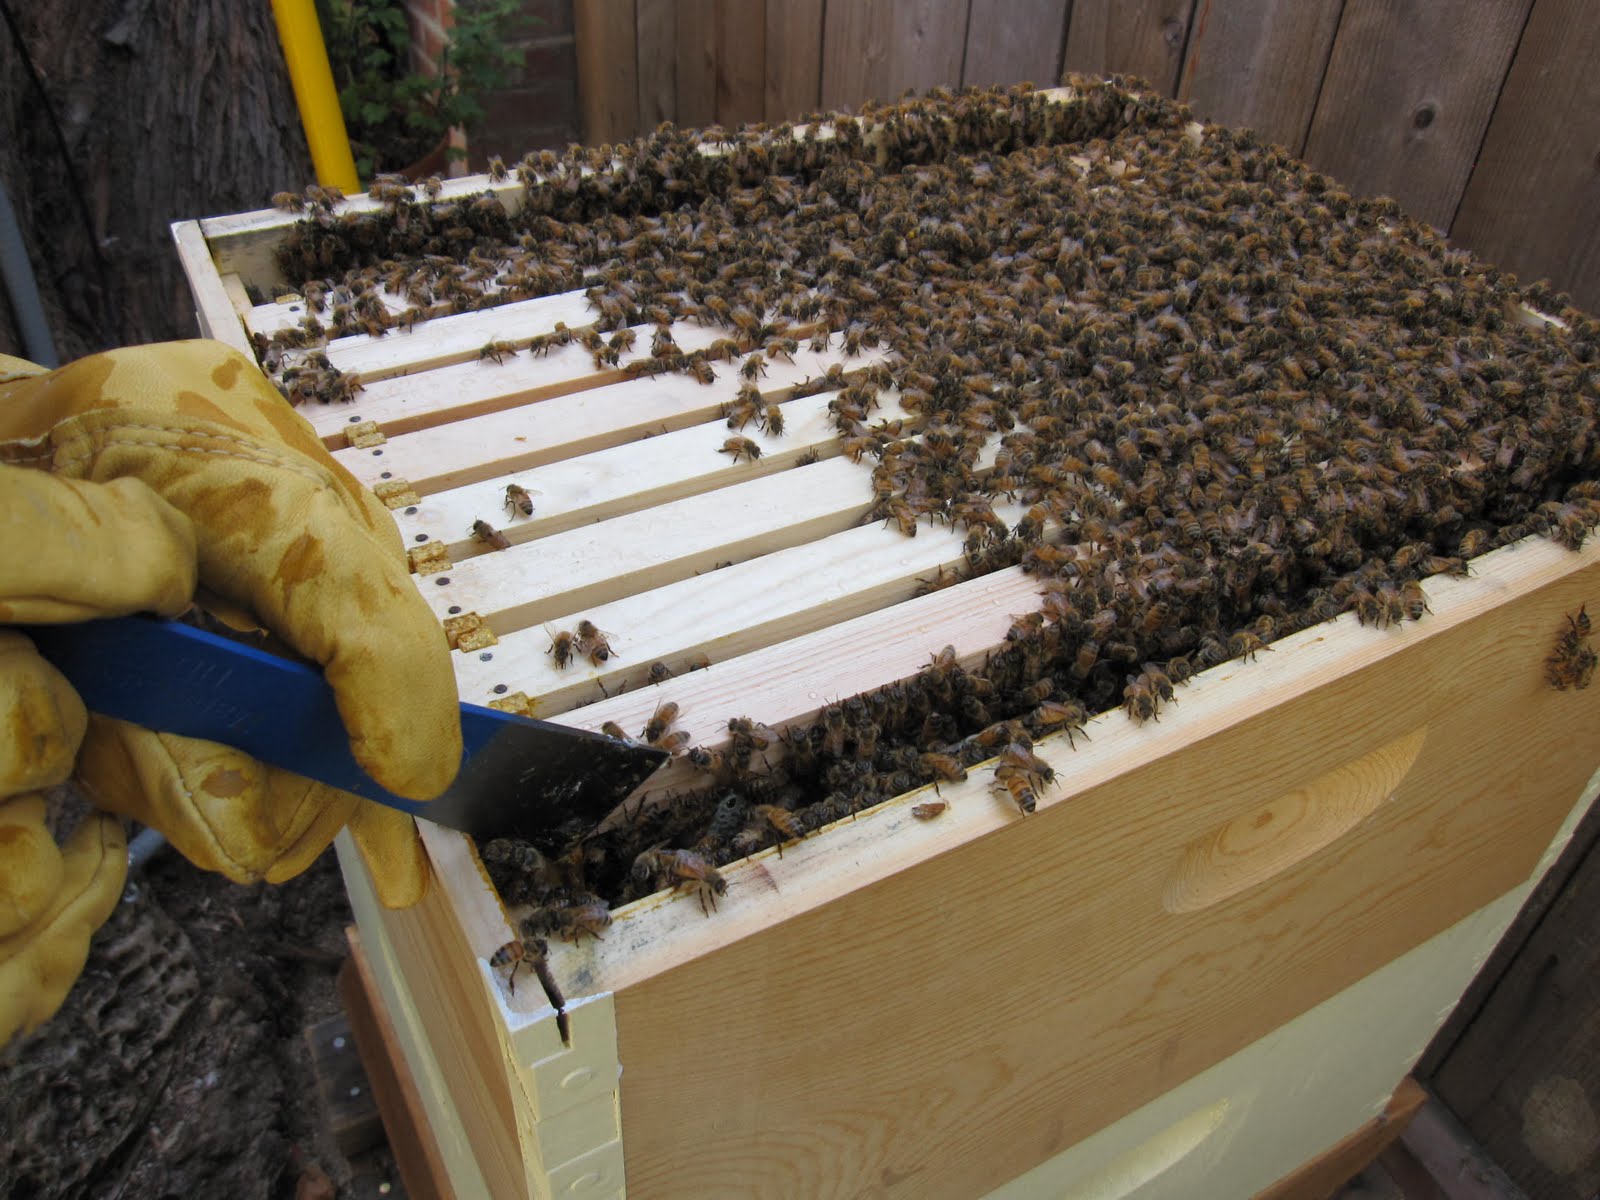
When you think of all the various flavors, Orange Blossom, Lavender, Wild Flower, I can hardly wait to taste Urban Sacramento! We managed to get everything put back together, very happy to get out of our now wet, bee garb, let the bees calm down and congratulate ourselves at our ever improving skillfulness at checking the hive. I’m pretty sure next time we will be tasting honey…I will be sure to give you a review!

Friday, June 18, 2010

It’s the age old question, bananas are black and mooshie, yikes what to do with them?! My husband eats a banana every day with little exception, so we always have them on hand. Well this week he was out of town for three days and simultaneously we have been launched into true Sacramento summer (‘bout time actually)with temps in the nineties, and since we do not have air-conditioning, relying on windows opened at night and good insulation to cool things down, the fruit in the bowl on the counter ripens up a lot faster. Before I knew it there they were, big, black, bananas…Now personally I only know of three things to do with bananas in this condition, and one of them is throwing them out. Wanting to go for something a little less wasteful, I was left with the other two options, a banana milkshake or banana nut bread. Banana milkshakes were my mom’s solution to overly ripe bananas. She would put a banana, a couple scoops of vanilla ice cream and milk into the blender and there it would be, a nice Saturday lunch for my sister and me. She figured it was pretty healthy – fruit and protein – as well as a nice treat and since we weren’t big eaters one shake took care of the two of us…


Well, today I didn’t have any vanilla ice cream in the house, but I did have all the ingredients for banana nut bread with the exception of walnuts, so imagining what bananas would taste like with pecans, which I did have, I went for it!

I used the recipe from ‘The Best Recipe’ by the editors of Cooks Illustrated – a great cookbook by the way if you are in the market for a good basic cookbook with good no fail recipes. It’s just a basic banana nut bread…

2C all purpose flour

¾ C sugar

¾ tsp baking soda

½ tsp salt
                                      
1 ¼ C toasted pecans, chopped course

3 very ripe bananas, mashed well

¼ C plain yogurt

2 lg eggs, beaten lightly

6 TBS butter, melted and cooled

1 tsp vanilla extract

Adjust oven rack to lower-middle position and heat oven to 350 D. Grease and flour bottom only of regular 9” x 5” x 3” loaf pan – now I have to interject here, how is it that someone who owns no less than six different loaf pans, never has one the size that the recipe calls for – am I the only one who has this problem? Just a question…

Whisk flour, sugar, baking soda, salt and pecans together in large bowl; set aside

Mix mashed bananas, yogurt, eggs, butter and vanilla with wooden spoon in medium bowl. Lightly fold banana mixture into dry ingredients with rubber spatula until just combined and batter looks thick and chunky. Scrape batter into prepared loaf pan, bake until loaf is golden brown and toothpick inserted in center comes out clean, about 55 minutes. Cool in pan for 5 minutes, then transfer to wire rack.

Well, soon the kitchen smelled heavenly and out of the oven came a beautiful loaf of bread…we let it cool just enough and then treated ourselves to a slice with a little butter…yum-er-iffic! Nothing like good old banana nut bread!

Sunday, June 13, 2010


Apparently, it has been a difficult season for cherries…the cold weather lasting clear into the end of May caused the cherries (according to the farmers at the farmers market) to be two weeks late to ripen. Then just after they started to ripen, it rained, which again according to the farmers, was very scary since the ripened fruit will split open if it is rained on! Well, somehow we (‘me and the farmers’) managed to make it through and the cherries at the market are beautiful and none the worse for wear…so ever seeking to prolong the season I decided it would be fun to can some cherries, both for pies etc. as well as some brandied ones that could be used as hostess gifts or such. I struck a deal with one of the cherry farmers and purchased an eighteen pound box of Bing Cherries.
 I brought them home and set up a little pitting station on the dining room table. When looking at that big box of cherries I was a little concerned that I had bitten off more than I could chew, but I was pleased that the pitting went quickly – I have a little pitter that does four cherries at once so I made pretty quick work of box contents…my nails and cuticles are now an amazing color of black/red that won’t wash off but what the heck…
Once the cherries were ready I made a light syrup – ¾ cup sugar to 6 cups water. It is suggested that you heat the cherries in the hot syrup until they are heated through, then put them into hot jars (I used quart sized for the pie cherries) with ½” head space, REMEMBER to remove the air bubbles by running a knife or chop stick around the inside of the jar, clean the jar rim and put on the lid. Put the jars in your canning pot covered with boiling water and once the water is at a rolling boil, process the quarts for 20 minutes… Now, while the pie cherries were happily boiling away it was time for the brandied cherries. I put 1 cup sugar, 1 cup water and ¼ cup lemon juice into a large sauce pan and brought it to a boil, then reduced it to a simmer, added cherries and heated them through. I removed the pot from the heat and stirred in 1 ¼ cups brandy. Now for these guys I used pint jars – don’t want folks, myself included, getting too boozed up on cherries – putting the hot cherries into hot jars, removing the air, cleaning the rims, blah, blah, blah and you’re ready to process.
By now the pie cherries were ready to be removed from the heat, so conveniently, I could just pop the brandied cherries into the canning pot, get the water boiling again and process the pints for 10 minutes…when all was said and done I had 8 quarts of pie cherries and 6 pints of brandied cherries! Not bad for a Sunday afternoon…they are so pretty, I may just have to crack one open and make a pie really soon!

Monday, June 7, 2010

What a great thing…our local food bank puts on what they call ‘mobile markets’. All over Sacramento, at various locations, on various days of the week, folks in need can pick up a bag of fresh food simply by living in the neighborhood. And to make it even better, Soil Born Farms donates fresh organic vegetables to the bags during the summer months! Well, apparently some of the folks receiving the food were unsure how to prepare the fresh vegetables,
so-o-o-o a group of volunteers (myself included) have started doing little cookingdemos at the mobile markets. What fun! The recipes contain the produce included in the bag. The recipes are simple – we all know it’s important when getting anyone to get excited about cookingvegetables it needs to be simple.
Well, I did my first demo last Thursday! My location is at a church where they volunteer their parking lot for the event. How exciting! They have a great little oven/burner camp stove sort of thing that really works – sort of makes you want to go camping just so you can use the cool equipment, a table for the little samples and a little canopy overhead …potatoes and corn were in the bag so we did a corn potato salad, very quick and a big hit. I just cut the potatoes into little cubes, tossed them in a little olive oil and roasted them in the oven at 400D for about 20 minutes; then I removed the corn from the cob and sautéed it, also in a little olive oil, until it just started to brown on the edges. I chopped a little red onion and some parsley and then put all the ingredients in a bowl, added a little salt and pepper and voila – corn and potato salad!
It was tons of fun to do the cooking in front of the folks at the mobile market and share ways to prepare a quick healthy side dish. It is very eye opening to realize that a lot of people are subsisting on pizza and fast food. Just a little fresh produce can be a beginning…I am so looking forward to my next opportunity to do a cooking demo at the ‘mobile market’ and share a few more fresh food cooking ideas with those in need…