Monday, August 29, 2011

Tomato Season in Full Swing!


As the season heats up and tomatoes start ripening as fast as you can say ‘ripe tomato’  those of us who planted lots of now healthy overproducing  tomato plants realize we need to get creative about how to use all that luscious fruit!  Of course we can simply can them, a good solution, or we can make salsas, pizza and marinara sauce or tomato jam, but then we start looking for other ideas…casseroles with tomatoes and eggplant, or lovely stuffed tomatoes that can create a meal in themselves.  Well, yesterday, as I tried to jazz up what I was going to fix for dinner, I discovered a lovely recipe for a tomato galette.   The basic recipe was in the book Chez Pannisse -  Vegetables, by Alice Waters.  Since I was doing a sort of spur of the moment dish, I made a substitution for the type of cheese and the color of the onions, and the result was delicious!

Tomato Cheese Galette

Ingredients:                                                                                              

                ½ recipe Galette Dough - see below

                3 large, ripe tomatoes

                2 medium red onions

                1 bunch basil

                8 oz mixed parmesan and mozzarella cheese

                Extra virgin olive oil

                Salt and pepper

Galette dough:                                                                              

                2 cups flour

½ tsp salt

¼ tsp sugar

6 oz unsalted butter

1/3 C ice water

First make the galette dough…

Combine the flour, salt and sugar (the sugar helps the pastry brown).  The butter should be cool - not cold and hard, but not too soft, wither.  Cut half the butter in to the flour mixture and work it in until the dough is roughly the texture of cornmeal - I did this using my hands as I seem to have better luck this way than using a fork -

Add the other half of the butter in marble-sized chunks.  Work it into the dough very briefly, leaving the butter in unevenly incorporated bits.

Lightly fork in the ice water just until evenly moistened.

Divide and gather the dough into two balls, cover separately with plastic wrap and knead very lightly through the plastic wrap, forming the dough into two even disks.  I always go ahead and make a full recipe and put the second disk in the freezer - nice to have that waiting for you when the galette bug next hits!

Refrigerate the dough and let it rest at least 1 hour.

Tomato galette:

Roll out the pastry dough to a circle about 12 inches in diameter.  Place it on a baking sheet without sides, lined with parchment paper, set aside. 

Cut out the stem end of the tomatoes and slice them 1/8 inch thick. Set aside on a towel to drain.

Peel and slice thin the onions and sauté them in olive oil until softened.  Season with salt and pepper and a handful of the basil leaves, chopped.  Let cool completely.
                                                                                        
Preheat oven to 375 degrees                                                       

Take the circle of dough and sprinkle with half the cheese, grated.  Spread the cooled onions over the cheese, leaving a 1-inch border around the edge.

Put a layer of whole basil leaves on top of the onions

Arrange the tomato slices, slightly overlapping, on top.

Season with salt and pepper

Sprinkle over the rest of the cheese and drizzle generously with olive oil.

Working around the circle of dough, fold the edge of the dough up and over to make a shell around the filling.

Bake for 50 minutes to an hour on the bottom rack of the oven, until the bottom of the crust is well browned.

Take the tart out of the oven and immediately slide it off the baking sheet and parchment paper and onto a cooling rack - leaving it on the pan will cause the crust to ‘steam’ and get too soft.

Garnish with the rest of the basil leaves and drizzle with ore olive oil.  Slice and serve immediately as a first course or as we did as a side with chicken or fish and a light salad.

Very summery faire and yet another way to take care of some of those wonderful tomatoes!


Saturday, August 6, 2011

It's Just A Little Thing...


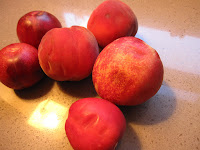
You might think the above photo of some once lovely stone fruit is looking a little like one might feel after a rousing night out with friends…just a little beat…and that what might be coming is a cautionary tale of produce gone wrong…but fear not friends…

At my last trip to the farmer’s market, last Sunday to be exact, the luscious piles of peaches, nectarines, plums and pluots cast their spell.  I was helpless, buying up bags of the juicy delights with no regard to our upcoming week’s schedules and how many meals and snacks would be eaten at home.  I arrived home with piles of fruit.  Now mind you we have given it the old college try, eating fruit with every meal, but I confess I went a little crazy…and there was just no way…
Now I want to say one word to you, one word, are you listening, plastics…no small batch canning (well actually three, but I couldn’t resist the reference).  Small batch canning is just what it sounds like, rather than make a giant production out of putting up pounds and pounds of your favorite produce, it involves small amounts and little time.  Whether it’s fruit from an overzealous trip to the farmer’s market that is about to go around the bend, that one extra tomato plant you put in at the last minute that has decided to commit suicide through over production, the need to have one or two jars of extra lemon curd in the cupboard just in case you have a need, or you simply don’t have the room for many jars of a single food item when there are so many other things to can, putting up small amounts of food at a time is the perfect solution.  Most preserving recipes are easy to revise to make smaller and there are even cookbooks dedicated to the subject.  The other plus is that this job can easily be taken on in an evening without the fear of staying up until midnight!
So back to my stone fruit…having put a good dent into our bounty through diligent consumption and some fruit still hanging in there, I had about 3 cups worth of mixed fruit that needed immediate attention.  I remembered seeing a recipe on one of the other food blogs that I particularly like, FoodinJars.com, for a mixed stone fruit jam.   I tracked it down and it was just what I needed…

Mixed Stone Fruit Jam

Adapted from ‘Food in Jars’

Recipe for aprox. 3 – ½ pint jars


Ingredients
Mixed Stone Fruit ( Peaches, Apricots, Plums, etc.) to make 3 C chopped fruit
 2 C.  Sugar
Juice & Zest of 1 Lemon

       1.            Set up 2 pots for boiling water
  A.       Processing pot
  B.      Lid pot
       2.            Wash jars
       3.            Get out tools
 A.      Potato masher
 B.      Jar lifter
 C.      Tongs
 D.      Wide mouth funnel
 E.       Towels
             F.       Chop stick
 G.      Ladle or big spoon
       4.            Put lids in small pot to heat
       5.            Put jars in canning pot
       6.            Peel Peaches and chop along with other stone fruit (Note:  if you drop the peaches into a       pot of boiling water for 30-60 seconds, then dunk into ice water, the peals will come right off)
       7.            Place all fruit in large bowl and add sugar, let mixture sit for minimum of one hour or as long as overnight
       8.            Heat mixture to 220D.
       9.            When mixture reaches desired temperature add lemon zest and juice
   10.            The jam is ready when a spoonful, dropped onto a plate firms up when cool.
   11.            Remove glass jars from pot
   12.            Fill jars with hot jam,   leaving ¼” head space
   13.            Remove air bubbles
   14.            Wipe edge of can with clean damp towel
   15.            With tongs put 1 lid on jar and finger tighten ring on jar
   16.            Put jars into canning pot
   17.            When water is boiling again, process ½ pint jars for 10     minutes
   18.            Remove from pot, cool
I cut the fruit, added the sugar and put the bowl in the refrigerator while we enjoyed dinner, and the air temperature dropped below 85, and after the dishes were all done, I cooked up the fruit, threw it in my jars, processed them and was in bed by 11:00, not bad, and there’s some yummy fresh jam waiting for us in the morning!

As an aside, any of you in the Sacramento area, I will be giving a small batch canning class at the Sacramento Natural Foods Coop on August  13th from 10 - 12:30.  So come and join in…it would be lovely to see you!